Technology
Aurora HDR Pro First Look…
by Rodney Campbell on Nov.25, 2015, under Life, Photography, Technology
There’s a new entrant in the HDR (High Dynamic Range) software package space called Aurora HDR from the maker of a suite of excellent photography software products for Mac computers macphun.
Aurora HDR is a joint project between Macphun and the worlds most renowned HDR photographer Trey Ratcliff.
It works as a standalone application and as a plug-in to Adobe Photoshop, Adobe Lightroom and Apple Aperture.
Full Disclosure: My copy of the software was provided for free – I’m also using the Pro version of the software. I’ll still tell you exactly what I think but I thought you should know in advance.
I’m also a landscape photographer with a particular passion for seascapes, long exposure and night photography. For the later two the use of HDR techniques are rarely if ever needed, and for my landscape work I don’t find I can get acceptable results using HDR (or rather tone mapping) tools. I much prefer either using filters in the field or exposure blending techniques (using layers and manually painted or luminosity masks).
So in that regard I don’t find I use HDR software all that often.
I do however find it a very useful tool when shooting architecture, especially indoor architecture. Where that enhanced detail and gritty look can often provide that additional level of interest to the image in addition to the contrast and extended dynamic range control. In particular I find it very useful when creating monochrome architectural work.
History
In the past I’d traditionally used either Photomatix Pro or Google/Nik HDR Efex Pro as my HDR software tool of choice. As I mentioned I’d never really liked what those packages did to images of the natural world (landscapes, seascapes, etc). When I did use them I tended to only make use of the “natural” presets as starting points and work from there.
More recently I’d switched to using them just to create the base 32bit HDR file (without any tone mapping) which I’d then bring back into Lightroom for my normal RAW post processing workflow. This would allow me to process the image with tools I was very familiar with just with a data file with much more dynamic range and data available to play with.
When Lightroom 6 was released with it’s new Photo Merge to HDR feature built in I switched to that as a quick and easy method for creating those 32bit RAW files for editing. The advantage was that this was a simple one step process and there were basically no controls (other than Auto Align (which I enable), Auto Tone which I basically never use and some very simple Deghosting controls (which is probably the weak area of this software)).
Back Story
I’d recently visited a lighthouse on the south coast of NSW here in Australia and had the opportunity to spend time inside with my tripod and Samyang 14mm ultra wide prime. With a dark central interior with small rectangular windows to the bright outside world scattered around the rounded interior it was a typical scenario for dealing with very large contrast differences.
I took a number of bracketed sequences with my Nikon D750 using 5, 7 or 9 auto brackets (spaced at 1EV intervals).
So when the chance to use a new HDR software suite came up I figured I’d run some images through and compare the results.
Note: This is based on Version 1.01 which is the current version of the software at this time.
Comparisons
For the following comparisons I’m editing the same images in at least three ways.
I firstly pre-process the source frames (5, 7 or 9 shots) with a few simple settings in Lightroom (e.g. Remove Chromatic Aberrations, White Balance, Highlight Recovery, etc).
– I then use Lightroom’s Photo Merge to HDR feature to create a 32bit DNG file and then edit that file in Lightroom using my “normal” post processing workflow
– As a reference I take a single D750 RAW file (typically the -1EV frame) and editing just that single frame in Lightroom using my “normal” post processing workflow (in some cases I just copy all the above workflow minus the overall Exposure adjustment to this file)
– I use the Aurora HDR Pro Lightroom export preset to feed the bracketed source frames into the plugin and process
Aurora HDR
I havn’t had enough time to give a detailed analysis of the features of Aurora HDR Pro however I’ll give you my thoughts and impressions so far.
The user interface is very pleasing and has that very familiar look and feel to anyone who uses software like Adobe Lightroom with it’s column of control sliders on the right. The layout is sensibly organised though in the pro version at least the number of available options is staggering and somewhat overwhelming.
It does however have a number of advanced options you won’t find in any other HDR software packages including the use of Layers (including Blend modes), Masking and built in Luminosity Mask.
The package comes with a number of built in presets along with a number supplied by Trey. I like most people find presets to be a useful means of seeing what end result options might be possible and then finding a good starting point and working from there.
In this instance I found that almost all the preset options were (in my humble opinion) too over the top HDRy. Even the so called “realistic” options were not very realistic to my eye and had too much of that eye popping saturation, crunchiness or inverted light that appears to be so prevalent.
The sliders in the software however do give you ultimate control so with practice and refinement I’m sure you can produce images which will look like you want them to. With as much or as little of that HDR look as you desire.
One thing I really like in this software is that the resulting image updates in real time with the movement of the sliders. This is one aspect of say Photomatix Pro which was annoying in that the image didn’t update till after the slider was moved and let go.
Samples
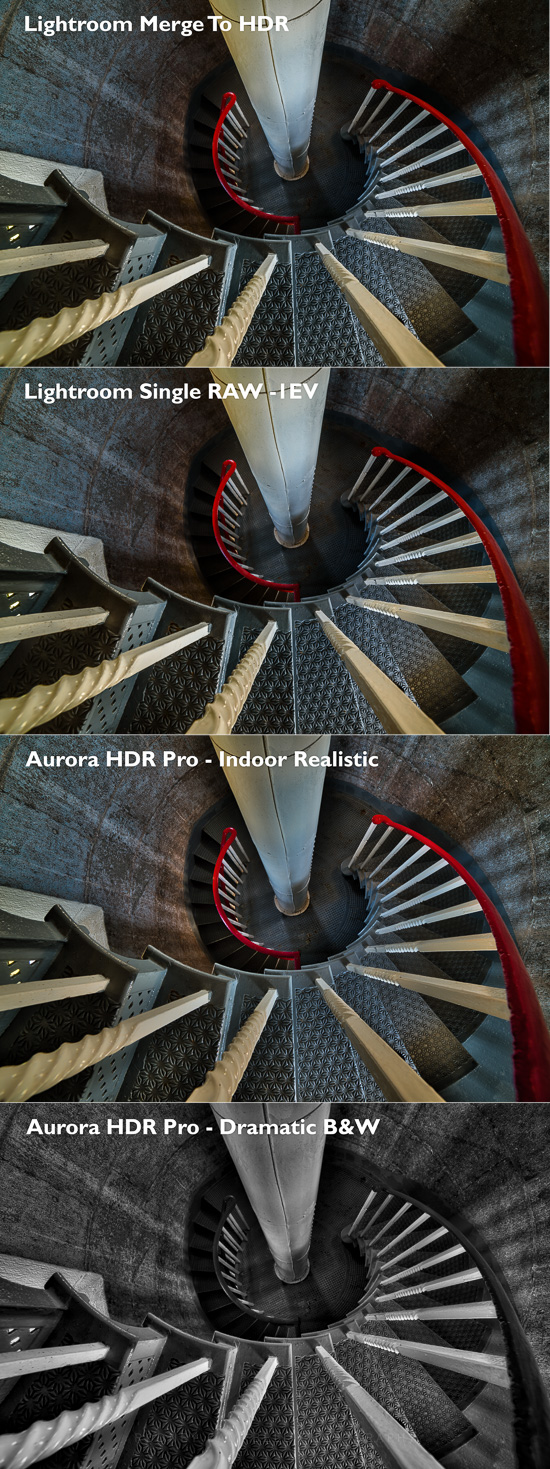
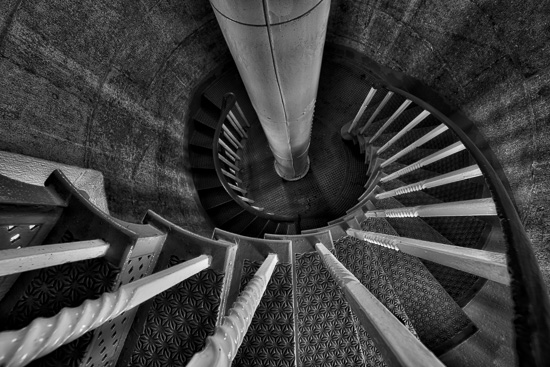
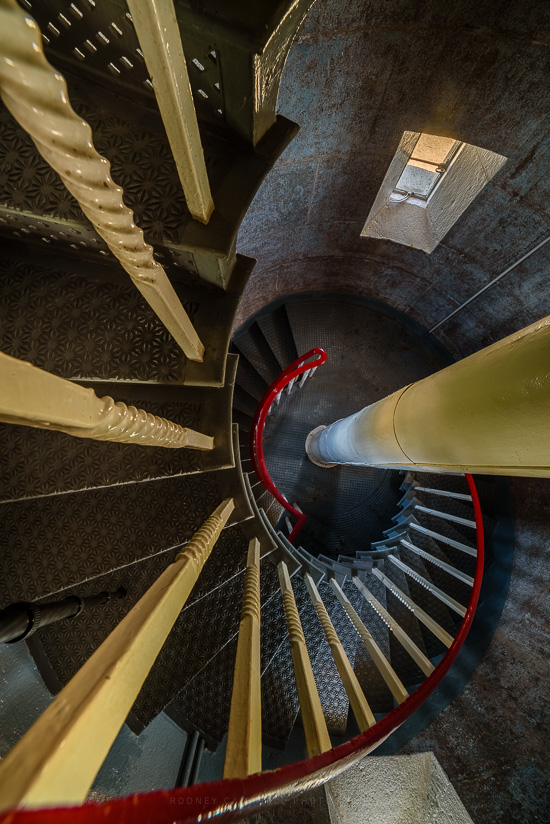
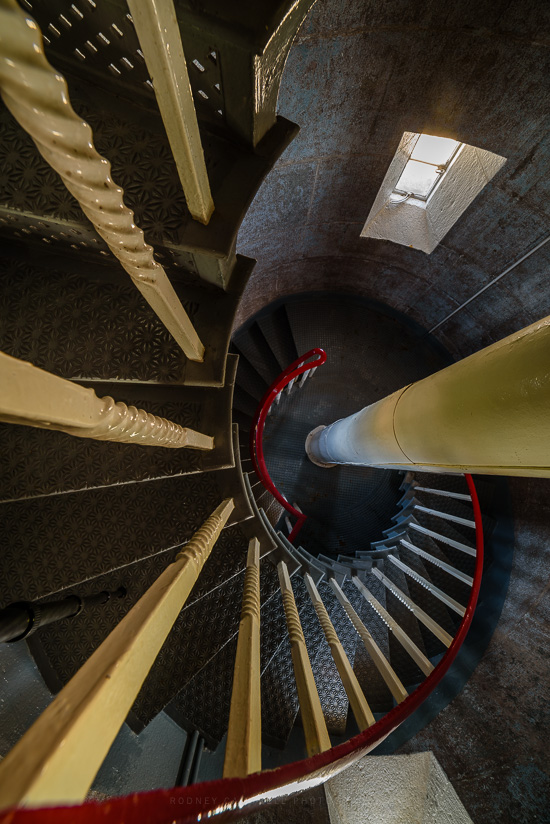
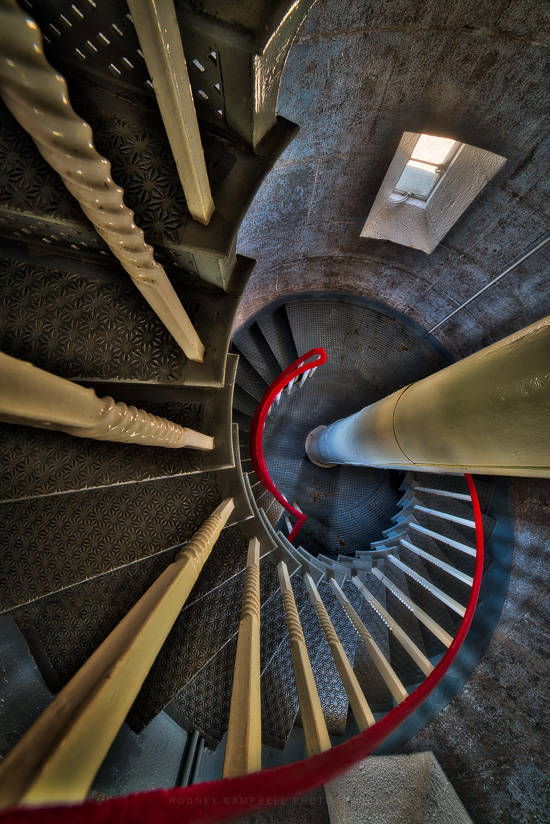
With this first sample I’ve performed the four processing’s of the image. The source data is nine bracketed frames taken from -7EV to +1EV.
The top image is a Lightroom Merge to 32bit HDR and then processed in Lightroom version.
The second has exactly the same Lightroom processing as the first (minus the overall Exposure adjustment) applied to just the single -1EV frame. What is remarkable here is the dynamic range retained by the D750. The resulting image is very nearly identical to the 32bit HDR merge (which has slightly better shadow detail).
The third is tone mapped in Aurora HDR Pro using the Indoor Realistic preset as the starting point and then with some tweaking of the sliders.
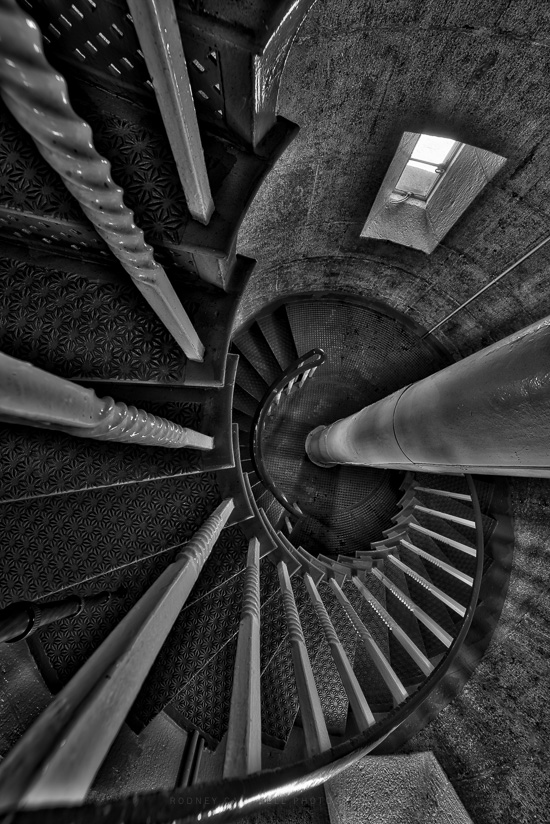
Finally the fourth version is also tone mapped in Aurora HDR Pro using the Dramatic B&W preset as the starting point and then with some tweaking of the sliders.
Note: These photographs (especially the wider shots) look much better when larger – so click any of the images below to see larger versions in an inline overlay slideshow gallery viewer.
Lightroom Merge To HDR
Lightroom Single RAW -1EV
Aurora HDR Pro – Indoor Realistic
Aurora HDR Pro – Dramatic B&W
Sample 2
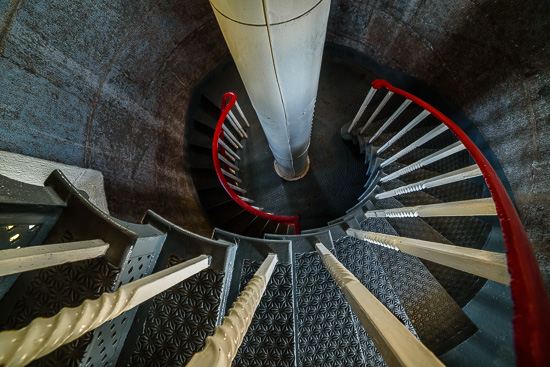
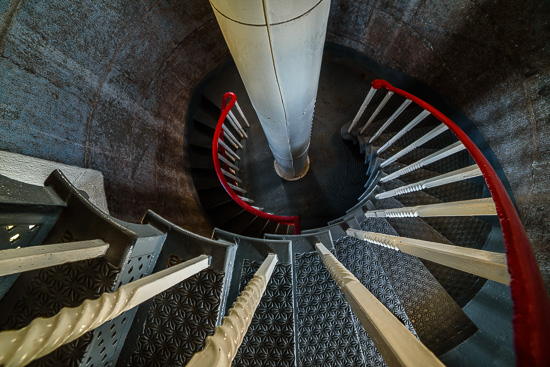
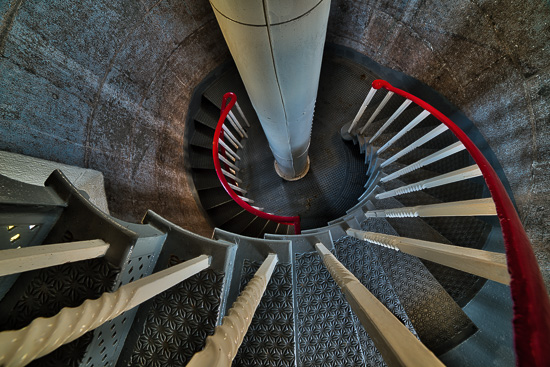
As above the source data for the images below is nine bracketed frames taken from -7EV to +1EV and I’ve performed the same four processing’s of the image.
Lightroom Merge To HDR
In this instance the 32bit HDR has recovered much more detail from the blown out window. Those -7 to -5 frames proving much more useful here. Moreso than even Aurora HDR was able to pull from the window (with my processing settings).
Lightroom Single RAW -1EV
Aurora HDR Pro – Indoor Realistic
In the Aurora HDR Pro versions the presence of some unnatural haloing around high contrast boundaries is present. For example that strange darker shadowing around the window area and the central pole. Likewise the lighter halo just beneath the stairs (esp the second stair) at the top left. We also have that telltale HDR “dirtiness” that can sometimes occur – for example on the top of the twisted rails on the left side – esp that one coming up into the bottom left corner.
This would likely be a scenario where ideally you would layer in some of the original frames and blend in some of those images into selective areas to remove any problem areas.
Aurora HDR Pro – Dramatic B&W
I’ve not yet had a thorough play with the extremely extensive options and features available in the software. When I have had a chance to become much more familiar and have had some time to make use of them I’ll post a follow up article on my experiences.
Lightroom Frustration – Rollback from LR 6.2.X to 6.1.1…
by Rodney Campbell on Nov.01, 2015, under Life, Photography, Technology
Lately I’ve been dealing with some serious frustration with Adobe Lightroom. I’ve had so many issues and in the end after trying many things to attempt to solve my problems I’ve given up in frustration and rolled back to the previous stable version of Lightroom (6.11).
If you want to cut to the chase and just learn how to do the rollback then those follow right now. Read after if you want to know the back story and a good list of very useful techniques to try and optimise Lightroom performance…
How to Rollback to Lightroom 6.1.1 or CC 2015.1
The instructions below refer to both the standalone Lightroom 6 and the Creative Cloud 2015.
1) Uninstall Lightroom 6.2.
On Mac, in Finder go to Applications -> Adobe Lightroom -> Uninstall Adobe Lightroom.
On Windows, use the Add/Remove Programs feature.
2) Download Lightroom 6.0.
You will need to download two files. You need both the Adobe Lightroom 6.0 Installer (Lightroom_6_LS_11 file) and also the Lightroom 6.1.1/2015.1.1 updater.
3) Run the Lightroom 6.0 Installer. If you are an Adobe CC subscriber when it requires you to sign in with your Adobe ID, it will determine if you are a CC subscriber; and if so, it will enable the Dehaze feature.
4) Run the Lightroom 6.1.1 Patch Updater.
Needless to say if you are an Adobe CC member you should NOT run the Lightroom updater in the Creative Cloud Manager.
What Lightroom Frustration?
When Adobe released Lightroom 6.2 I dutifully updated Lightroom soon after the Creative Cloud Manager said an update was available.
Actually at that time no massive frustration actually occurred – unlike a number of other people I was having no major issues with 6.2. Perhaps it did run a tiny fraction sluggish at times (e.g. when doing lots of adjustment brush edits or laying down lots of Spot Removal tool pins) however I’ve experienced those before with previous versions.
The only real frustration with 6.2 was the changed import tool and the removal of features I used (like Move).
So eventually Adobe released the “fix” which came in the form of 6.2.1 and my upgrade again was smooth.
What I didn’t account for was upgrading my operating system to Apple‘s new OS X 10.11 El Capitan.
Here is where disaster struck and the frustration really begins…
Some Symptoms:
– sometimes Lightroom would just appear to hang.
– sometimes some parts of the UI didn’t work as expected/supposed to.
– sometimes very laggy UI/stuff doesn’t refresh properly (seconds to minutes to wake up).
for example in the Library module when attempting to click on one of those little triangles to open up a folder of images – it would just not do it
likewise in the develop module clicking on one of the triangles on the right to open up a develop panel – nothing…
also going into the Library View Options and attempting to change certain preference settings – nothing – or you’d have to wait a minute for the change to take effect.
– sometimes the cursor would turn into that little line with the up and down arrows (like you’re trying to resize a panel) and you then couldn’t click on most of the UI items – however you could still click on images in grid mode and change modes.
– sometimes right click would stop working.
– sometimes that larger message text overlay (e.g. when you go into full screen mode and it says to press Command F to get out) which appears in the bottom middle of the screen would come up but not ever go away (even when you switch between modules, etc).
– sometimes you couldn’t get to the menu bar at the top of the screen at all.
often the fix for the above would be to quit Lightroom and restart and it would work again for a little while until one of the above wierdnesses would happen and then it would be all over.
– sometimes Lightroom would hang on quit (and you’d then have to force quit).
What Did I Try to Fix This
I’m sorry Adobe – I really did try to do the right thing and get your software to work. However some combination of both your 6.2.X software and Apple’s El Capitan really doesn’t mix well!
So I spent a number of days in frustration pulling my hair out trying to fix this thing or at least getting it to be somewhat stable and usable.
Things I tried to resolve the issues – none of which worked. However these are all very good things to know because many of these techniques are designed to both optimise and improve Lightroom performance in general.
1) Deleting the Lightroom Catalog Previews file (Lightroom Catalog Previews.lrdata) (and restarting Lightroom – and sigh… letting Lightroom rebuild previews…).
2) File -> Optimise Catalog…
3) Starting Lightroom whilst holding down Opt (Alt) Shift and reseting the Lightroom Preferences.
This was very painful as I had to redo so many things to get back to my normal workflow. It doesn’t just reset all the settings in Lightroom -> Preferences… I also had to re-licence and re-authorise many of my Lightroom Plugins and Web Templates (I use quite a few from Jeffrey Friedl, Timothy Armes and others). I also had to redo all my settings for the UI and the Develop Panels and the Adjustment Brushes and so forth. I’m still not sure I’ve got everything back to normal.
4) Un-installing and re-installing Lightroom (using the Creative Cloud Manager).
5) Lightroom (Mac) or Edit (PC) -> Preferences, and on the General tab, uncheck “Show Add Photos”.
6) Lightroom (Mac) or Edit (PC) -> Preferences, and on the Performance tab, uncheck “Use Graphics Processor”.
7) Lightroom (Mac) or Edit (PC) -> Preferences, and on the File Handling tab, increase the Camera RAW Cache Settings to much larger values (e.g. 20GB, 50GB).
8) Clear History for a large set of images from my Catalog.
I currently have 132,685 images in my Catalog and my Lightroom Catalog.lrcat file was sitting at 22.5GB!. I selectively pared this down to 17.9GB (and I could definitely do more). I’ll write up a separate blog post on this technique because it is quite useful and somewhat unknown, and provides a good way to clean up some of that cruft which can build up in your Catalog file.
Anyway – now that I’ve rolled back to 6.1.1 (CC 2015.1) my frustration has ended and all seems back to somewhat “normal” in my Lightroom world…
Review: Phottix Aion Wireless Timer and Shutter Release…
by Rodney Campbell on Aug.10, 2013, under Life, Photography, Technology
I’ve used a number of wired and wireless shutter remotes with my various Nikon D-SLR’s – this is a review (and comparison) of my latest acquisition in this space – the Phottix Aion Wireless Timer and Shutter Release.

Firstly a list of some common functions found in most programmable timer shutter releases:
- Self Timer – Just like the self timer on your camera. The timer remote switch allows you to set a variable delay (usually in 1 second increments up to 99 hours, 99 minutes and 99 seconds)
- Interval Timer – Can be set to any time period up to 100 hours as well. If you set it to 10 minutes, for example, one exposure will be taken every 10 minutes until either the storage runs out or the Exposure Count limit has been reached
- (Long) Exposure Length – Allows you to take timed exposures (usually from 1 second in 1 second increments up to 99 hours, 99 minutes and 99 seconds)
- Exposure Count Setting – This setting allows you to set the number of exposures that will be taken (usually a set number from 1 up to 199 or more or infinite). For example, if you set it to 30 times, then 30 exposures will be taken
Secondly a list of some of the previous remotes that I’ve used or am still using with my Nikon D600 (and D7000 – they both use the same remote shutter plug):
- The Nikon Wireless Remote Control ML-L3. Uses the built in IR receiver in many Nikon D-SLR’s to perform simple functions (basically trigger the shutter). It is distance limited and work by line of sight and if you want one I’d suggest buying one of the knock offs you can find on eBay for less than $5 delivered rather than the $30 original
- The Aputure Wired Timer Remote. It allows you to set the self timer, exposure length, frequency, and exposure count and it also allows continuous shooting or bulb exposures. Time can be preset from 1 second up to 99 hours. The LCD panel can be backlit for night time shooting. Basically this is a low cost (less than $20 on eBay) copy of the more expensive Nikon MC-36 remote. If you want a very functional wired remote these are an excellent choice
- The Yongnuo Wireless Timer Remote Control Shutter Release MC-36R. This has the exact same control unit as the Aputure/Nikon MC-36 above in a wireless form. It has a 2.4GHz RF wireless receiver which plugs into the camera (and the unit can sit in the camera hotshoe) – this means the camera can be triggered from long distances (usually somewhere from 50-100 metres away) and is not restricted to line of sight. Most forms of this model can also be supplied with a wired cable (for a specific camera series) allowing the control unit to be plugged directly into the camera to use it as a wired remote
- The Nikon Wireless Mobile Adapter WU-1b. This dongle allows you to control your camera from your iPhone or Android device – it’s kinda good (you get to see remote live view – a few secs delayed) but it’s flaky and not particularly reliable
- Triggertrap Mobile. This is a neat combination of a relatively inexpensive ($10 for Full or Free basic version) iPhone (IOS) or Android app and some relatively inexpensive hardware (dongle+cable $20) to connect your phone to your camera to trigger it in a variety of programmable ways
The Phottix Aion Wireless Timer and Shutter Release so far looks very good – and has a couple of advantages over the previous specific purpose programmable intervalometer/timer shutter remotes I’ve used/owned:
- It can do 0.1sec increment shot duration and intervals (the previous ones I’ve used can only do to 1 sec). However I tested this with my D7000 and the fastest reliable shutter length I could achieve was 1/3 (0.33) seconds – in fact for the timer settings from 0.2 to 0.9 sec you basically need to add 0.1 sec to the setting you use because this is the actual shutter time. Still 1/3 sec onwards at 0.1 sec increments is a lot better than whole second increments
- Uses standard AAA batteries (and I can use rechargables) in both the transmitter (control unit) and the receiver (camera end) – the other ones typically use the special (& expensive) CR2 battery
- The control unit can be powered off (there is a power switch) – all the other models I’ve used cannot (only the receiver unit could be) – the batteries lasted for ages anyway so that wasn’t a huge deal but often the buttons would get randomly pressed in your bag and you’d take it out to use it to find it’s running a program with some weird settings
- Has a long exposure HDR bracketing mode (which isn’t as useful as it sounds – since it’s fastest shutter speed is 1/10th (1/3rd) of a sec and whole stop increments from there so is only useful in pretty dark conditions)
- Came with all three connector cables for all types of Nikon D-SLR camera models (the round one (N1) for pro bodies, N2 for the older D80/D70s and the rectangular (N3) for the consumer bodies) so can be used with other Nikon cameras (mine or other peoples) – I’ve often been out shooting with friends who have forgotten to bring a remote shutter release which would allow them to shoot bulb mode long exposures (e.g. for light painting) and it would have been handy for me to have lent them something which would work with their camera type
- Has a 5 shot continuous mode as well as a 2 second delay mode (which I don’t think I’d use personally however…)
Nikon D600 Viewfinder Light Leak Update…
by Rodney Campbell on Feb.11, 2013, under Life, Photography, Technology
In my previous post I indicated I might do some further testing to see whether the light was only leaking in during the moments the mirror is moving up and down.
Turns out this isn’t the case…
The following three shots were taken under the same conditions – low light room with the viewfinder cover removed – camera sitting on the desk with lens cap on and a manual shot at 30 seconds @ f/8 and ISO 100
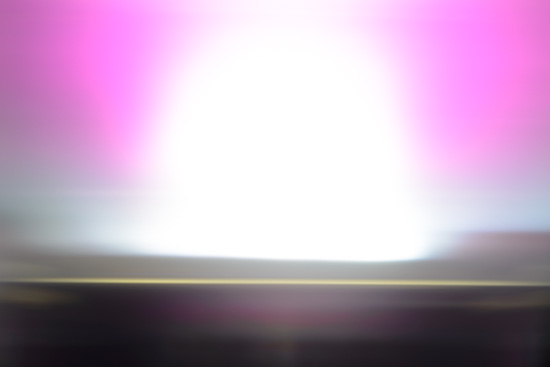
In this first shot I waited about a second after the shutter is triggered and then shone the LED torch directly into the viewfinder for most of the exposure (20 seconds?) but ensuring I turned it off before the end (before the mirror flips up again) – as you can see it’s leak city
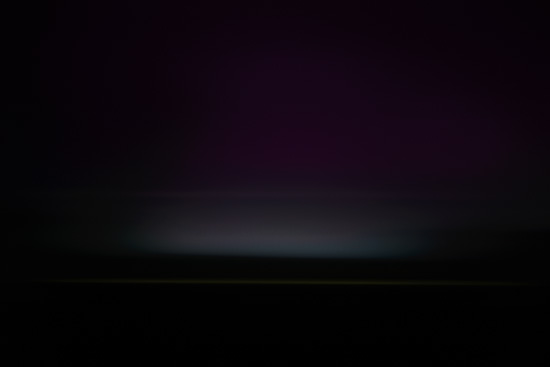
This second is the reference frame – same exposure but no torch lighting the viewfinder hole – all black as expected
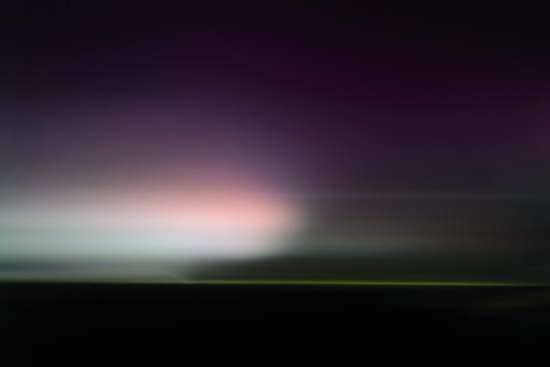
and this third is similar to the first in that I triggered the shutter – waited about 5 seconds and then shone the torch briefly at the viewfinder (from further away and with less intensity) for only a few seconds (less than 5) and then stopped and waited for the rest of the 30 second exposure to complete
as you can see even still a faint leak is registered
Nikon D600 Light Leak through the Viewfinder Issue…
by Rodney Campbell on Feb.02, 2013, under Life, Photography, Technology
A couple of days ago I posted about a light leak issue I was having through the viewfinder with long exposures. I got a few responses from people I know and trust including
the purpose of the eyepiece blind is to prevent light entering the viewfinder to affect your image’s exposure settings, but when you’re making the exposure, the mirror is raised up against the focusing screen, preventing any light that might be entering though the viewfinder from entering the mirrorbox, and thus affecting the actual image that you’re shooting. That’s why the viewfinder blacks out during the actual moments of exposure
So I’d planned to investigate this further by doing some more test shots (with the screw in ten stop ND to exclude any possible light refraction and other issues with the mess of Lee filter stuff I usually shoot with – Lee filter holder with Bigstopper, GradND and the 105mm CPL on front) when another friend suggested a much simpler test 🙂
So…
I setup the test as follows – I waited till it was dark outside (night) and then setup my camera on my desk with the following settings:
– Lens cap on
– Camera body set to manual focus
– Manual in bulb mode with an Aperture of f/8 and ISO 100
– Used a remote interval timer set for an exposure of 3 minutes
– Long Exposure Noise Reduction OFF
All of the images below are straight out of camera RAW images converted to JPEG – no other adjustments made
This first exposure is the baseline – the room was darkened but I used the viewfinder cover to completely block out the viewfinder for the shot – the shot is completely black as expected – the only interesting fact is that the shot appears to have no noise (even at 100%) – nice (and only one hot pixel to be found)
This second shot is the same camera position, etc – the only difference is that I removed the viewfinder cover and shone an LED torch at the viewfinder from a slight angle from about 30cm away – draw your own conclusions…
I decided to follow up with a few more tests. I took two shots with the room lights on – the first with a dimmed setting; the second with the lights (LED downlights) up higher and with the camera angled at about 30-40 degrees so the back of the camera was pointing a little more up towards the ceiling so that some of the light might spill into the viewfinder but not be pointing directly into the viewfinder. I’ve included the second of those tests here but essentially they were both black like this
I then pointed the camera straight down on the desk so that the ceiling downlight shone down into the viewfinder – again I should be expecting a completely black image – you can see how that turned out…
Lastly to exclude the effects of things like the sensor circuits heating up, etc (this was my sixth consecutive 3 minute exposure with almost no time between each) I took another shot with the room lights on but the viewfinder cover in place (in fact the camera was still in exactly the same position as the last shot – facing downwards on the desk with the downlight shining directly onto the back of the camera) and as you can see completely black again – and again even at 100% I see no evidence of noise (dark current, etc) and only just the one hot pixel
So seems reasonably conclusive to me. I do however intend on doing a further test – I want to see if the light leak might be happening only during the moments the mirror is being raised or lowered and so I’ll try some tests like:
– dark room, start the exposure with the viewfinder exposed but don’t start shining a light at the viewfinder till after the mirror flips up and also stop it before the mirror flips down
– as above but start the light before raising the mirror but stop before lowering
– ditto but start the light after the mirror raises and stop after the mirror drops
